0 Comments

As a part of a larger project I am working on at the moment, I have decided to invest in some new equipment for manufacturing / fabrication. This is the second in a series of posts where I will discuss some of the equipment I am looking at.

After my first post I realised that I should probably go back and first talk about

The Basics

A lot of homes have access to a basic set of hand tools, things like:

  • a hammer
  • screw drivers
  • pliers
  • spanner sets

(and I'm not talking about the cutlery draw here :-) )

Obligatory Warning: Please do not take any of this information as suggesting that you should make use of any of these tools. Please always make sure you understand what you are doing, wear the appropriate safety equipment, use the correct tool for the job, and make sure you follow the manufacturer's instructions. If you are in anyway unsure, please seek professional advice. Most tools can potentially be dangerous, if not fatal.

Now that that's out of the way...

Whilst I won't go so far as to suggest that every home should have these items, that list is certainly what I would consider to be a bare minimum.  In addition to these, I would also suggest the following would be useful:

  • tape measure
  • socket set
  • allen key set
  • drill (either mains powered or battery)

If you have (or have access to) these types of tools, you should be able to accomplish a larger number tasks that may crop up around the home.  There are also some more specialised tools that you may wish to make use of.  For instance, if you are doing a lot of woodwork then you may also find the following useful:

  • circular saw
  • jigsaw (the power tool)
  • sander (belt or orbital)
  • air compressor

Or if you find yourself doing metal work, then:

  • hacksaw
  • angle grinder
  • welder

Now, none of these lists are supposed to be exhaustive, and indeed if you are working in any of these mediums or others you will have a better idea of what tools you need. Nor are they supposed to be exclusive (many tools can be used for many different applications). In my case I have all these tools (and indeed others I have not listed) as I tend to work in a number of different mediums.

One important thing to note here: I'm not suggesting that everyone has to go out and purchase all these items (I certainly didn't).  I simply accumulated them slowly over a period of time as I needed different tools for different jobs. I am also aware that in today's society a lot of people will simply outsource any work to tradesmen.  There is nothing wrong with that (and sometimes is the better option), it's just not the path I chose to take. In some cases I don't have a choice and have to outsource the work, either because a special license / training is required, or because I don't possess the specialised tools / skills needed.  But I will have a go when the work is inside my skill level (or I will seek training).

There is also another set of tools that I will probably discuss in a future post.  That is tools specifically related to working with electronics.

If you have any questions or suggestions, please leave a comment below.
0 Comments

As a part of a larger project I am working on at the moment, I have decided to invest in some new equipment for manufacturing / fabrication. This is the first in a series of posts where I will discuss some of the equipment I am looking at.

The first piece of equipment that I would like to talk about is a CNC Mill.

CNC Mill

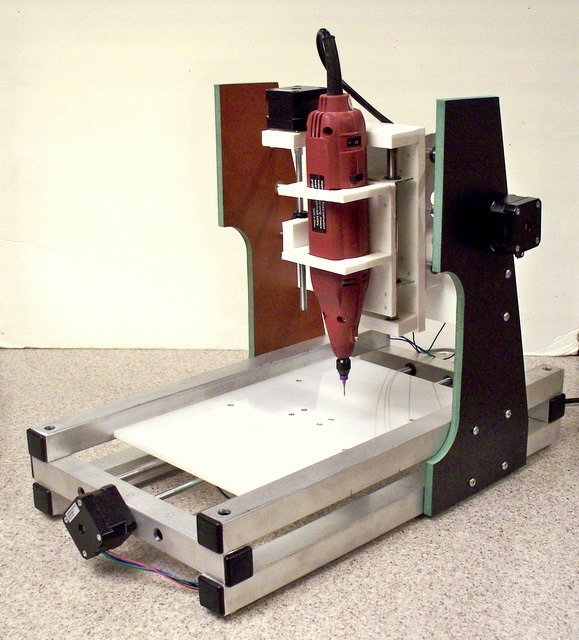
The CNC mill I have chosen is a MyDIYCNC unit from MyDIYCNC.com. To quote Stephen from the project description:

"Born out of frustration with the lack of inexpensive, straightforward and easy-to-build CNC machines I designed a DIY desktop CNC package that addresses all the objections I had with available machines."

The project was actually started on Kickstarter (which is where I discovered it). At the time of writing the main MyDIYCNC.com was not yet taking orders (however I do have a kit on order as a result of backing the project on Kickstarter).

mydiycnc4

(Image courtesy of MyDIYCNC.com)

There are a number of reasons why I chose to back the project (and ultimately end up with the finished product). I would be lying if I didn't say that price was a factor.  At USD 390 for a complete kit, this represent not only good value for money (in my opinion), but a new low price point for CNC mills (traditionally they have been closer to $1000).  Although I could have sourced my own parts locally (which I did consider), in this instance I opted for a kit as it gave me confidence that I will be getting all of the correct parts, the first time.

The second reason I chose to go with the MyDIYCNC product was that (in my opinion) it is a well engineered package. It is based on good design principles without being an overly complex design.  The result is a kit that should be easy to build and maintain.  Also, items like the stepper driver boards and anti-backlash nuts (which he designed) are more example of elegant simplicity in the design. While Stephen could have used off the shelf items for many of the components, by putting the effort in he was able to meet all of his design goals.

Unlike some other designs that people have made available, Stephen is planning on making the product available as a commercial offering. The result of this is a product that is more robust and well designed; as it needs to be accessible to other people (i.e. it’s not just a once off item).

A third reason I like the product is that it has been designed in a very modular way. What this means for me is that I can (for instance) very easily make a much larger work bed using the same design.  Or I can replace the spindle with a different type of head (a laser cutter for example).

Now, I do have to point out that at the time of writing this, I do not yet have my kit. The Kickstarter project was successfully funded, and now Stephen is in the process of obtaining all the raw material and assembling the items / kits. Once I have taken delivery of my kit I will post more information.

If you have any questions or suggestions, please leave a comment below.
1 Comments

As alluded to in my previous post, I have been able to acquire and build a couple of nixie tube clocks. 

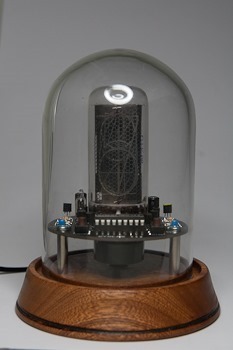
The first clock is a single digit clock, where the time is displayed by each digit of the time being shown one after the other.  In other words, if the time is 12:57, then you will see a 1, then a 2, then a 5, and finally a 7. This particular clock uses a single IN-18 tube, and was purchased in kit form that I assembled.

Nixie-Clock-Dome

(The Cyclops Clock)


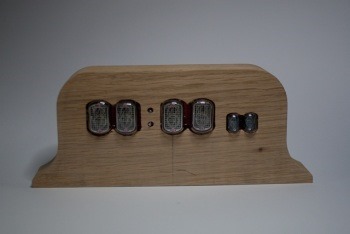
The second clock I have is a more traditional style clock. Consisting of 4 IN-12 tubes (the digits are 18mm high) for the hours and minutes, and 2 IN-17 tubes (the digits are 9mm high) for the seconds display. This clock is presented in a nice oak case.

Nixie-Clock-6-Digit

(6 Digit Nixie Clock)

I have not yet completed construction of this clock.  Once I do I will post some updated photos.

0 Comments

One of the things I find fascinating is nixie tubes.  A nixie tube is an electronic device used for typically displaying numerals (although practically anything can be displayed). Nixie tubes were originally manufactured in the 1950's primarily for use as displays in electronic equipment. Although it resembles a vacuum tube in appearance, its operation does not depend on a heated cathode, and is therefore sometimes referred to as a cold-cathode.

Unfortunately technology has moved on, and nixies have been superseded by VFD (Vacuum fluorescent display) and subsequently LED (Light-emitting diode) displays. And as such are becoming harder to obtain. As they are no longer manufactured, the only supplies available are NOS (new old stock).  Items that have never been used, but have been sitting in storerooms for many years.

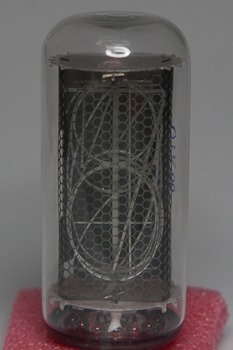
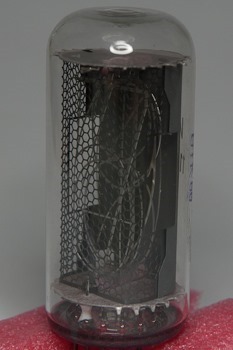
One of the largest Nixie Tubes still available is the IN-18 (pictured below). The digits are 40 mm high by 18 mm wide.

Nixie

(Front view of an IN-18 Nixie Tube)

Nixie-Side

(Side view of an IN-18 Nixie Tube)

You should be able to see in the two pictures how the individual digits are stacked on top of one another.


One of the more popular uses for Nixie Tubes today is as displays for clocks.  But more on that later....

3 Comments

April 2018 - Updated to add: As per the comment from Vic, the OrbShield has been superseded by the Orbotron9000 (love the name), which can be found at http://store.thingotron.com


Original post:

While I am by no means a serious gamer, I did spend my childhood years playing games like Wolfenstien, Wing Commander, and later Descent. As much as I loved the 3D game evolution, I was never satisfied with the control mechanisms available at the time.

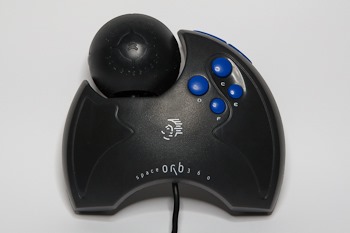
During the 90's a company called SpaceTec released a product called the SpaceOrb 360. The controller I had been looking for was finally here. Unfortunately, being a student at the time I could not afford one. Nor would my father buy one for me (I'll speak to you about that later dad)

SpaceOrb

(Spacetec SpaceOrb 360)

Fast forward to 2010. Thanks to the wonders on the Internet and eBay, i found one NOS (new old stock) and promptly purchased it. Couple of weeks later and I finally had the controller I always wanted in my hands (yes I know it's a bit sad). However, nothing is ever as simple as you may wish. In the intervening years, computer hardware and software have moved on quite a bit. In my case this meant that a serial connection was required (which my PC does not have). On its own that would not be a show stopper. But in addition to needing a serial port, the device also required drivers. Drivers that have not been developed or working since Windows 95 (or maybe Windows 98, i can't remember). Lack of drivers is a bit more difficult a problem to solve.

Enter Vic Putz. Vic also wanted to be able to use his SpaceOrb on modern computers. Thankfully he decided to do something about it. His initial attempt was to create a Win32 HID minidriver known as "hidsporb". While it did work he was never 100% happy with it. And in the end it would not work on Windows Vista or 7 without some major rework (anybody who has done any Windows driver development will understand).

Not one to give up, he came up with a new (and in my opinion, ingenious) solution. Instead of trying to create the driver in user mode, he decided to create the driver in hardware.

No that is not a typo.

What Vic did was to create a circuit (more on that later) that emulates a HID device. Specifically either a mouse and keyboard, or a joystick. The net result is that you have a device in Windows that practically any game came use for control. To quote Vic:

"And what you get is a hot-pluggable USB orb, six axes, 16 buttons with chording. And the best thing, folks--it JUST WORKS. You plug it in, you get an orb. You unplug it, orb goes away. It's a hot-pluggable USB device just like we always wanted."

Game on!

The actually hardware that he used was an Arduino Diecimila with a custom shield (Arduino speak for a daughter board). The beauty of the solution is that by using a programable microprocessor, it becomes very easy to modify the configuration that is being presented to Windows. If you want to invert the vertical axis, or if you want to configure all 16 possible buttons to particular key strokes (I think macros may even be possible) you can. And because it's all done in hardware, if you want to take your SpaceOrb around to a mates place and use it on his machine, you only need to unplug it and take it with you. No driver or special software required (it's all built into Windows).

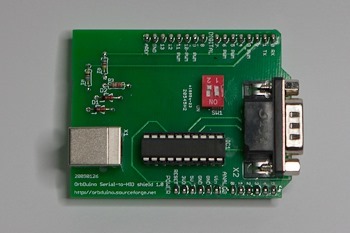
OrbShield

(The assembled OrbShield)

Now, the reason i actually started writing this post was to document a particular problem I was having, in case anyone else finds themselves in the same situation. What I was finding, after everything was built, plugged in, and programmed, was that nothing happened (queue dramatic music). Windows would see the HID device, but none of the inputs on the SpaceOrb were registering. When I couldn't find anything wrong with the circuit I had assembled, i decided to test the SpaceOrb with an old Windows XP laptop and the hidsporb driver. Thankfully that worked. So I knew I didn't have a dead SpaceOrb. The next step was to go over the circuit again with a fine tooth comb (or in my case, a multimeter). Again I couldn't find anything wrong. So I decided to put it off to one side and work on another project of mine (more on that another time).

Some time later I decided to have another go. This time while i was performing some tests I noticed sometime odd (or rather hot). Specifically the MAX233 chip. This chip is responsible for converting the signal to/from serial (rs232). In my case i found this chip was getting exceptionally hot (enough to leave a blister on my finger). So I swapped the chip with a new one. And in a very anticlimactic finish, everything started working. (The MAX233 can be seen in the above image. Its the long black chip in the lower center part of the board).

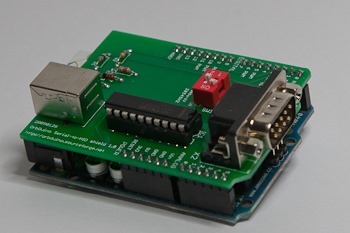
OrbShieldUno

(The OrbShield mounted on an Arduino Uno)

I'm still not sure what caused the chip to fail (whether it was just DOA, or whether I let the magic blue smoke out), but at least the fix was easy and cheap (replacement chips are only a couple of dollars). The reason i wanted to document this was that it wasn't until I just happened to put my finger on the chip that I found out what was wrong. Hopefully if someone else has the same problem, they will find this and save themselves some time and frustration.

More information on the OrbShield can be found at:

Please feel free to leave a comment if you have any questions or feedback.